
If you're like me and you paddle creeks every weekend, eventually you are going to break a boat.
I first discovered John Whaleys duct tape welding technique back when he was paddling his old Wavesport Descente. John's boat had 13 (yes, THIRTEEN) cracks in the bottom of it, but he had successfully patched every one of them! The patches actually outlasted the boat; the plastic ended up wearing through on the bottom of the boat on the NF Mollala.
Every repair method has its pros and cons, but I like John's technique because it is fast, cheap, and easy.
I have used this technique to repair boats, and I have found that it is pretty bomber, assuming you can get the crack to stop (see below). Since all of the new boats have gone with linear plastic, this is much more of a challenge than back in the days of cross-link.
In order to fix a cracked boat with WhaleyWelding, you will need:
A. A power drill with a small drill bit
B. A roll of duct tape
C. A spoon
D. A hair dryer
E. A small piece of sandpaper
F. A damp cloth
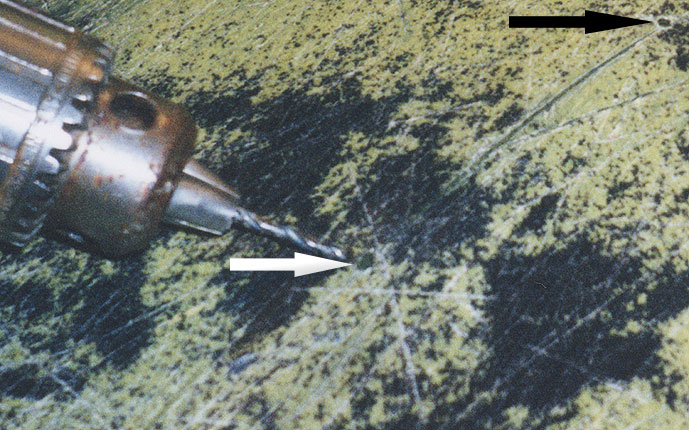
In order to stop the crack, select a small drill bit and carefully drill out either end of the crack. It is absolutely critical that the holes are exactly centered on the crack, otherwise the crack will 'jump around' the hole and you will have to start from scratch.
If you do it right, the crack will stop.
Once you have drilled out the crack, it will look something like the image shown below. Notice that the holes are precisely lined up with the ends of the crack.
![]()
A photo of the two-inch long crack in my boat, with both ends drilled out.
First, take a bit of sandpaper or Dragonskin and rough up the area surrounding the crack on the inside of the boat. Once you have roughened up the surface, wipe down the surrounding area with a damp cloth, ensuring that the patch area is totally clean.
The key to a successful Duct Tape weld is HEAT combined with PRESSURE.
Place a piece of tape over the crack, extending a couple of inches or so beyond the end of the crack on either end. Press the tape firmly down onto the boat so there are no air bubbles.
Use the hair dryer to head the duct tape up until small wrinkles appear in the surface of the tape. This means the glue on the tape is beginning to detach from the tape and sink down into the roughened surface of your boat.
Heat until small wrinkles appear in the surface of the tape. I was on my fourth layer at this point. You have to re-heat every layer.
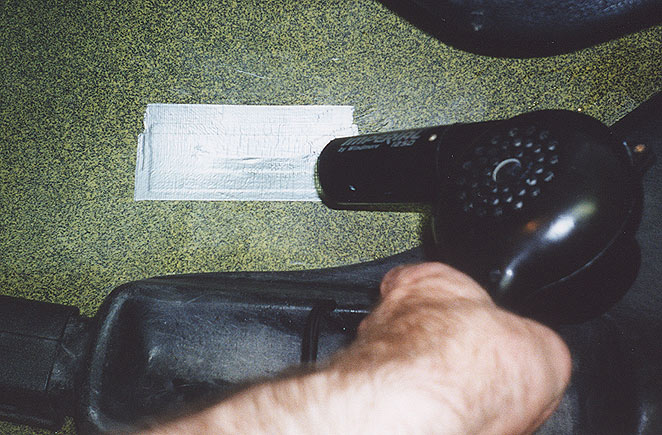
Applying pressure. I was on my fourth (and final) layer at this point. The tape should be so completely smashed that when you run your finger along the edges you can barely feel that it is there. As you can see, I was dragging the spoon on the heated tape, and it started to tear.
If you are careful this won't happen.
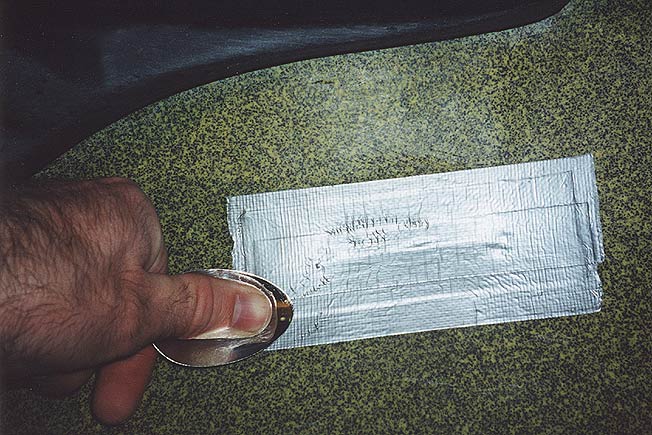
I know you are thinking: This cannot possibly work. How can Duct Tape repair a boat? Well, it does. I've done it, and these patches have withstood beatings that you wouldn't believe. They are water-proof, flexible, and very, very tough.
If you do it right, you will have a boat that is ready to go after about 30 minutes of work.
2) Kayak manufacturing generates pollution and consumes a lot of energy. If you are an environmentally-conscious consumer like myself, you cannot justify frequent purchases of new kayaks. How can you gripe about dams choking off our rivers when you have a garage full of kayaks?
Guess what: you can't!
3) Kayak plastic cannot be recycled. Great, bigger landfills. Just what we needed.